
A border will add the finishing touch to a blanket, it will neaten a uneven edge, square everything up and give substance to your blanket. Your choice of crochet edge can make or break your blanket.
Leaving an edge unfinished is fine, but if you really want your project to stand out, choosing an appropriate edging can really give it 'the edge' !! ;-)
There are many decorative border designs, but sometimes for a busy blanket, a neat straight border is all that is needed.
For this border you will need to know:
How to make a Chain stitch (Ch) (st) HERE
How to make a Slip stitch (Sl st) HERE
How to make a Treble stitch (Tr) (USA Double crochet (Dc) HERE
I will be using UK crochet terminology for this tutorial (For conversion to USA see HERE)
This tutorial will show you how to crochet a simple border with tips for leveling the sides and overcoming a wavy edge as in the photo below.

One of the things that can happen when starting your border is that it can start to go wavy, But don't panic!
Most often this can be rectified simply by dropping down a hook size (or two) for the following rounds, this will 'pull in' your crochet, and tighten up the wavy edge. Try dropping down half a hook size at a time until you are happy with how it looks and feels.
On the other hand, if your crochet border is too tight and is beginning to 'pull in' or 'pucker', you will need to unpick this, and go up a hook size (or two) as unfortunately this cannot be corrected by increasing your hook size alone.
THE LEVELING UP ROUND
The first round of my border is the base round, for leveling up minor imperfections or creating a specific number of stitches for working into during your following round.
I like to crochet this round using a discreet color, the same color as the blanket or a color that wont 'stand out', as the stitches in this round may be irregular, so it helps to avoid drawing attention to them.
For the purpose of this demonstration I will edge my Amazing Daisy blanket.

To start
Round 1 Insert hook into any stitch along the side of the blanket, Ch1, Dc into each stitch
around the entire edge of your blanket, making 3Dc into each of the 4 corner spaces and leveling up any dips that may be noticeable.
For example: On the edge of my granny square blanket at the point where I have joined the squares together, there is a slight dip, so I will need to make a longer Tr stitch into the joining seam to bring it up to the same level as the Dc stitch on either side, thus counteracting the dip.
When you have crocheted all the way round, sl st into the top of the Ch1, Fasten off.

In the photo above USA stitch terms have been used. For UK terms the stitches would read, from left to right, Dc, Tr, Dc.
Round 2 New color
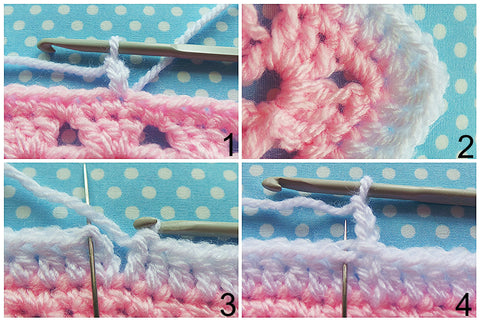
Insert hook into any st on a different side of the blanket (varying the starting places will make your joins less obvious), Ch3, Tr into next st and each st around, making 3Tr into the middle st of the 3Dc corner sts, sl st into the 3rd ch of ch3. (pics 1-3) 
Round 3 Ch3, Tr into same st, Tr into each st around, making 3Tr into the middle st of the 3Tr corner sts, Do not crochet into the last tiny sl st (pic 5). Fasten off (pics 4-6)
Round 4 New color
Insert hook into any st along a different side of the blanket, Ch1, Dc into next and each st around, making 3 Dc into the middle st of the 3Tr corner sts, sl st into top of ch1. (pics 7,8)

For an invisible and professional finish, cut yarn, pull out the end from the loop, thread end onto a tapestry needle, bring end though next st from back to front and then back though previous st from front to back, sew in all ends, this makes a false stitch :-) (pics 9,10)

Thank you for dropping by! I hope you have enjoyed my Border tutorial!
You may also like to try my Dinky Dot Blanket Pattern

Also see How To crochet A Straight Granny square

And my FREE Sunny Rainbow Blanket Pattern when you subscribe to my newsletter

Have a great day! Hope to see you soon!
Kerry :-) x
Thank you Kerry for your excellent tips which will end up making a more professional finish to my crochet.
Thanks for those tips – they’re really helpful ?
Very good instructions for beautiful border.
Thank you for taking the time to post this wonderful tutorial! It will help me a lot with the next blanket I make.
Thank you for this tutorial Kerry – I have been trying to perfect my borders and this is just what I needed. I love your work and regularly crochet your patterns.